Did you know that if current trends continue, the oceans could contain more plastic than fish by 2050? That eye-opening statistic isn’t science fiction—it's a reality highlighted by global environmental experts. With plastic pollution choking our waterways and overwhelming landfills, the challenge may seem insurmountable. But a technological revolution is quietly taking shape: AI robotics in plastic waste recycling. This innovation is rapidly changing how we manage, reduce, and repurpose plastic waste, making cleanup efforts more intelligent, accurate, and scalable than ever before. In this article, discover how these advanced systems are not only transforming the recycling process but also helping to build a future where our planet is cleaner, healthier, and more sustainable. Unveiling the Scale: The Startling Problem of Plastic Waste "By 2050, there could be more plastic in the oceans than fish unless significant action is taken." — United Nations Environment Programme Plastic has become one of the most persistent and challenging pollutants on Earth. Every year, millions of tons of plastic waste are generated globally, much of which ends up in oceans, rivers, and landscapes rather than being recycled. With recycling rates in the United States hovering around only 9%, the vast majority of plastic continues to pollute our environment. This mounting crisis demands innovative solutions, as traditional recycling systems struggle to keep up with increasing waste streams and complex recyclable materials. The urgency is reinforced by bleak projections: if no drastic action is taken, the weight of plastic in aquatic environments is expected to rival or surpass that of marine life by 2050. This pollution harms not only wildlife—entangling marine animals and infiltrating food chains—but also endangers human health and disrupts economic activities tied to clean water and tourism. Facing this challenge requires more than placing plastic bottles in recycling bins; it calls for a fundamental transformation in how we collect, sort, and process waste. Enter ai robotics in plastic waste recycling—a rapidly evolving field that leverages advanced technology to tackle what may be this century’s defining environmental challenge. What You’ll Learn About AI Robotics in Plastic Waste Recycling The role of AI robotics in plastic waste recycling within the circular economy
Recent advances in AI and robotics technologies for the recycling industry
Opinion on the transformative potential of computer vision and AI platform solutions
A detailed look at the modern recycling process
Insights into waste management challenges and opportunities Understanding AI Robotics in Plastic Waste Recycling
How AI Robotics Elevate the Recycling Process
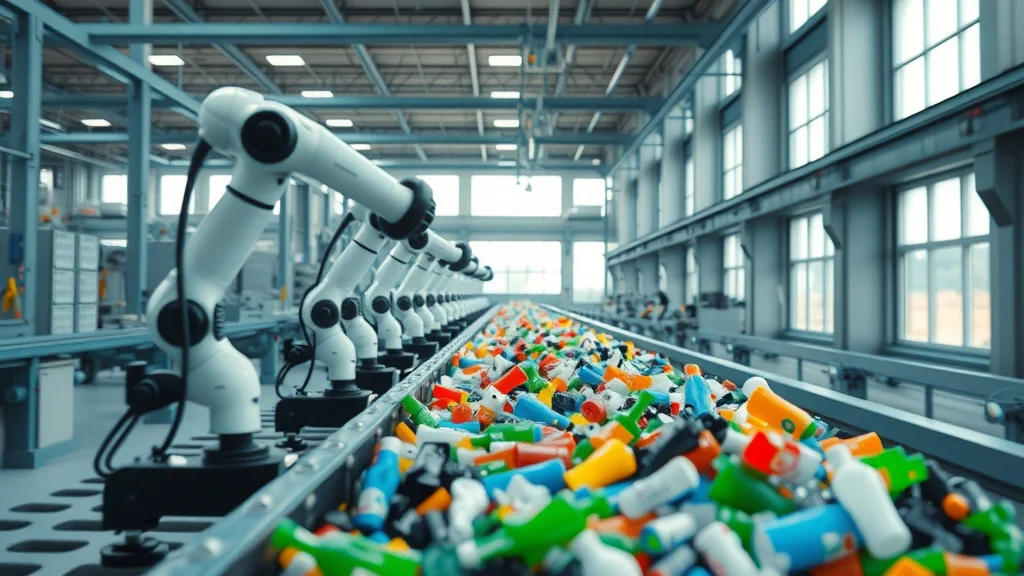
AI robots and robotics systems are redefining how we manage plastic waste. Traditionally, sorting recyclable items at large facilities required significant manual labor, frequently resulting in contamination across waste streams and missed opportunities for recovering valuable materials. Now, with the integration of AI robots—equipped with advanced computer vision and machine learning enable tools—the recycling process is being revolutionized for both efficiency and precision. These intelligent robots are programmed to quickly recognize and separate different types of plastic from mixed waste, using high-speed cameras and optical sensors to analyze millions of pieces of waste every day. By leveraging AI platforms, the system not only increases speed but also reduces errors and contamination, leading to higher recycled content and better quality materials for reuse. The impact? Recycling rates soar while operational costs drop, and the recycling sorting process can now handle items per minute that far surpass human capability—sometimes even quadrupling throughput in advanced facilities. Integration of AI robot in sorting and processing
Use of computer vision for high-precision waste separation
Roles of AI platform in scaling recycled content operations As AI-driven automation becomes more prevalent in recycling, it’s important to recognize how these technologies are influencing not just environmental outcomes but also the broader job market and industry landscape. For a closer look at how policy and innovation intersect to shape green jobs and sustainable industries, explore the impacts of political actions on offshore wind jobs in America and their ripple effects across the clean energy sector. From Theory to Practice: Circular Economy and the Recycling Industry
How AI Robotics Drive the Circular Economy
The concept of a circular economy centers on keeping materials in use for as long as possible, reducing waste and extracting maximum value from resources. AI and robotics are at the core of making this vision a reality within the recycling industry. With advanced recognition abilities and learning enable software, these systems can adapt to changing waste streams, ensuring that more materials are captured for processing and less ends up in landfills or incineration. As AI platforms scale, they help develop robust recycling systems that move us closer to a circular, zero-waste economy. Recycled content is not only higher in quality—thanks to AI-powered sorting—but more consistent, giving manufacturers confidence to use recycled material in new products. This process bridges a crucial gap, transforming the entire value chain by driving demand for recycled items, reducing reliance on virgin plastics, and ultimately fostering a more sustainable, resilient environment. Transforming the Recycling Industry with AI and Robotics
The adoption of AI and robotics in recycling facilities marks a pivotal shift for the industry. Cutting-edge robotics systems, paired with machine learning, dynamically adjust to new packaging or plastics entering the market. Real-time data from AI platforms aids in optimizing the sorting process, reducing contamination, and increasing both the quantity and quality of recycled materials. This lets recycling rates improve significantly over legacy systems, which relied on slow, error-prone manual labor or less flexible automation. Furthermore, these systems pave the way for the development of smart waste management strategies, providing data-driven insights for policymakers and city planners. With transparent reporting, better identification of problematic materials, and seamless integration with recycling plant operations, AI robotics are equipping the recycling industry to meet global sustainability targets and inspire further innovation. Opinion: Will AI Robotics Redefine Waste Management? "Embracing AI and robotics is not just innovative—it’s essential for a sustainable future." As the world’s plastic crisis intensifies, relying on outdated recycling strategies is no longer sufficient. The integration of AI robotics in plastic waste recycling stands out as a transformative approach, not just improving existing processes but fundamentally redefining what waste management can achieve. The primary benefits—unrivaled efficiency, high accuracy in material recognition, and the ability to scale quickly—make AI robots a vital piece of the environmental puzzle. However, their adoption is not without challenges. High initial costs, technical complexity, and the need for skilled maintenance can be barriers for recycling operators, particularly in lower-income regions. Yet, as technology matures and becomes more accessible, these obstacles are likely to diminish. Governments, industry leaders, and innovators must collaborate to ensure AI robotics remain at the forefront of global waste management solutions, empowering a shift towards truly sustainable resource use. Benefits: efficiency, accuracy, and scalability
Potential setbacks: high initial costs and technical complexity Watch state-of-the-art AI robotic sorting systems in action at a leading plastic recycling plant. See real-time recognition, rapid separation, and seamless teamwork between smart machines and human operators—demonstrating how AI and robotics are revolutionizing the recycling process from start to finish. Key Technologies: Computer Vision and AI Platforms in Recycling
Practical Applications of Computer Vision
Computer vision is the technological backbone enabling AI robots to differentiate among an ever-growing variety of recyclable items. In practice, this means deploying high-speed cameras and optical sensors along sorting belts, using machine learning enable algorithms to identify everything from water bottles to food packaging by color, shape, and even material composition. These precise methods drastically reduce contamination in recycling streams, creating a cleaner, purer recycled product. The speed and accuracy of computer vision allow facilities to manage items per minute output far beyond human capacity, ensuring that recyclable materials are never missed or mistakenly sent to landfill. By driving more efficient sorting, computer vision supports both higher recycling rates and a healthier bottom line, making the dream of a truly circular economy much closer to reality. AI Platform Innovations Supporting Recycled Content
Beyond mechanical sorting, advanced AI platforms bring innovation to the entire lifecycle of recycled content. These platforms can collect and analyze massive datasets on waste stream composition, recycling rates, and material flows, offering actionable insights to plant managers and sustainability teams alike. With increasingly sophisticated analytics, recycling facilities can fine-tune operations, forecast material supply, and even identify emerging trends in packaging waste. Critically, AI platforms boost the value of recycled material by ensuring that only the most suitable and pure content makes it into the supply chain. For manufacturers, this delivers recycled content that meets or exceeds quality requirements, boosting both sustainability credentials and consumer confidence. The continuous feedback loops enabled by AI lead to ongoing improvements, driving the entire recycling industry toward greater environmental impact and profitability. Industry Spotlight: Companies and Innovations Leading AI Robotics in Plastic Waste Recycling Top AI robot manufacturers in the recycling industry
Case studies: successful circular economy integration Trailblazers in the recycling industry are already putting AI robotics to work at scale. Leading companies such as AMP Robotics, ZenRobotics, and TOMRA have pioneered commercial solutions that use artificial intelligence and computer vision to sort mixed recyclables with unprecedented precision. Their AI robots can operate 24/7, process thousands of items per minute, and substantially reduce operational costs—proving that advanced technology is not just a dream but an achievable business advantage. Case studies from the United States, Europe, and Asia reveal how these innovations enable higher recycling rates and better recycled content quality. For instance, partnerships between recycling plant operators and AI robot companies have resulted in more consistent output, less contamination, and greater adaptation to new consumer packaging. These real-world successes demonstrate the potential of AI and robotics to lead the charge toward a sustainable, circular economy on a global scale. Discover the difference that AI robotics in plastic waste recycling is making every day. See how materials once destined for landfills are now identified, sorted, and repurposed, contributing to a recycling industry that’s more effective and less polluting. Challenges and Opportunities in AI Robotics for Plastic Waste Recycling Challenge
Opportunity
Impact on Recycling Process Material contamination
Advanced computer vision
Higher recycled content Operational cost
Automation by AI robotics
Improved recycling industry sustainability Public awareness
Digital outreach via AI platform
Supporting the circular economy Challenges remain—especially regarding contamination, the upfront investment required for advanced technology, and public education. But each challenge also presents a concrete opportunity. With more affordable and adaptable AI robots, and increased outreach and data transparency via digital platforms, the path forward is one of continuous improvement. The result will be a recycling industry more capable than ever of handling global waste streams and propelling us toward a truly circular economy. The Future Outlook: Evolving AI and Robotics in the Recycling Industry What’s next for AI and robotics in plastic waste recycling?
Scalability and global impact for waste management systems The next generation of AI robotics in plastic waste recycling will be smarter, faster, and even more collaborative. Advances in artificial intelligence, robotics system integration, and computer vision are poised to enable not just the largest recycling facilities but also smaller, community-based operations, supporting large-scale adoption worldwide. Interconnected AI platforms will share learnings in real-time, optimizing performance and further reducing the recycling gap between regions. As these systems become more affordable and robust, scalability will no longer be a hurdle—even developing nations can benefit from state-of-the-art sorting processes and data-driven waste management. The endgame? A recycling industry capable of adapting to changing consumer habits, producing near-zero waste, and laying a foundation for a truly sustainable, circular world. People Also Ask About AI Robotics in Plastic Waste Recycling
How does AI robotics improve the recycling process?
AI robotics improve the recycling process by automating the recognition, sorting, and separation of recyclable materials. Leveraging computer vision and machine learning, these systems can quickly identify and sort plastics with far greater accuracy than manual workers, reduce contamination, and increase both efficiency and output rates in recycling facilities. Can AI robotics help achieve a circular economy?
Absolutely. By ensuring that a higher proportion of waste is effectively sorted and recycled, AI robotics support the closed-loop principles of the circular economy. Better sorting means higher quality recycled content, which manufacturers can reuse, reducing the need for virgin materials and keeping plastics in circulation longer. What are the main benefits of using AI robots in the recycling industry?
The main benefits include improved sorting precision, higher throughput, lower operational costs, and increased recycling rates. AI robots also adapt to evolving waste streams and provide data-driven insights, making recycling systems more agile and sustainable for future growth. What is the future potential of AI and robotics in plastic waste recycling?
The future of AI and robotics in plastic waste recycling is incredibly promising. As technology continues to develop, we can expect smarter, more accessible systems capable of handling even greater volumes and more complex waste streams worldwide—pushing us closer to a zero-waste, circular economy model. Frequently Asked Questions (FAQs) How reliable are AI robotics in sorting plastic waste? Current AI robotics demonstrate high reliability, with accuracy rates that often exceed human sorting, particularly in modern facilities utilizing advanced computer vision technology.
Which industries benefit most from advanced waste management solutions? Packaging, manufacturing, food and beverage, and retail sectors benefit the most, as these industries create significant amounts of plastic waste and can directly reuse quality recycled materials.
Can AI platforms integrate with legacy recycling systems? Yes, most modern AI platforms are designed to retrofit on top of or alongside legacy sorting facilities, enabling step-by-step upgrades rather than full system overhauls.
What makes recycled content more valuable with AI technology? AI technology increases the purity and consistency of recycled content, making it nearly as desirable as virgin material for manufacturers and boosting the value of recycling output. Key Takeaways on AI Robotics in Plastic Waste Recycling AI robotics are critical for the future of plastic waste management
They advance the recycling process and circular economy
Continuous innovation in AI and robotics benefits the recycling industry and the planet Conclusion: The Transformational Impact of AI Robotics in Plastic Waste Recycling
AI robotics in plastic waste recycling are transforming cleanup—helping us close the loop and build a future where managing waste means healing the planet, not harming it. As you reflect on the powerful role of AI robotics in revolutionizing plastic waste recycling, consider how these innovations are part of a much larger movement toward sustainable industry transformation. The intersection of technology, policy, and workforce development is shaping the future of clean energy and environmental stewardship. If you’re interested in understanding how political decisions can influence the growth of green jobs and the broader sustainability landscape, take a deeper dive into the complex relationship between political actions and offshore wind job creation in America. Exploring these connections can offer valuable perspective on the challenges and opportunities that lie ahead for a greener, more resilient world. Ready to Make a Difference? Earn While You Clean Up the Planet "Offer the CSR26 plastic credit-Make Money-Save the Planet: https://jointhecleanup.com/seamandan" Sources United Nations Environment Programme – https://www.unep.org/news-and-stories/press-release/planet-plastic-pandemic-un-report
US EPA – https://www.epa.gov/facts-and-figures-about-materials-waste-and-recycling/plastics-material-specific-data
AMP Robotics – https://www.amprobotics.com/solutions/recycling/
ZenRobotics – https://www.zenrobotics.com/recycling-robots/
TOMRA Recycling – https://www.tomra.com/en/recycling
Chemical & Engineering News – https://cen.acs.org/environment/recycling/artificial-intelligence-robotics-future-recycling/97/i41 The integration of AI robotics into plastic waste recycling is revolutionizing the industry by enhancing efficiency and precision. For instance, AMP Robotics has developed AI-powered systems capable of identifying and sorting plastics by type and color, processing up to 80 items per minute—more than doubling the efficiency of human workers. (recyclingtoday. org) Similarly, Penn Waste in Pennsylvania has implemented AI-driven robots from Glacier, which utilize advanced computer vision to sort various materials at approximately 45 picks per minute, addressing challenges like low recycling rates and understaffed facilities. (axios. com) These advancements not only improve sorting accuracy but also significantly reduce contamination in recycling streams, leading to higher-quality recycled materials and a more sustainable future.


Write A Comment